Home Improvement
The Novices Guide To Garden Shed Building
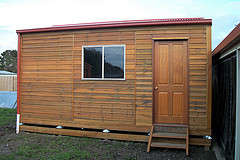
 If like most people you have clutter than clogs up your garage then it could well be time to build yourself an outdoor storage shed. These separate outbuildings make for excellent practical solutions when storing items like bicycles, garden tools, lawnmowers and even ladders. In other words, all of the kind of things that we love to cram into our garages – or indeed pile up outside.
Once you have decided that a garden shed will solve your storage problems it is then time to decide if you want to buy ready-made or opt for more flexibility and produce one yourself.
Whichever route you plan to go then this blog post is definitely for you. Here we will be sharing some essential tips that will help even the novice to get this job done.
Building Plans
Assuming that you are going to build the shed yourself then the best way to start is to get hold of a set of shed building plans.
Thankfully there are quite a few places online that you can pick these up from. A great example of one site is storageshed-plans.com (no affiliate link). The nice thing about their plans is that each set of plans comes with 2 different design levels. This tends to help the shed fit into different budget areas. Using this site or indeed one of the others will provide you with scaled drawings, construction details and a full list of the materials that will be needed to complete the task.
If you are going to tackle the task alone then think about the timescale that you have available. Unless you enjoy working outside in poorer weather conditions it might be sensible to check when you will have 2 or 3 days without fear of rain. One factor that frustrates most novices, even when they have a super set of plans is that things take longer than they feel they should. Very often this, combined with the pouring rain can be enough to abandon even the most straightforward of tasks.
Shed Location
Okay, assuming that you now have your plans then the first thing to do is to think about where you want your new shed.
In most cases a well selected site can make the difference between overall success and failure. Put simply, here you will want to make sure that the following all apply:
- Easily accessible
- Dry
- Relatively level
These might sound like basics; however, you would be surprised to learn just how many people choose the wrong location. Potential hazards could be things like building in a low-lying area that is prone to collecting water. The shed will be at risk of excessive moisture, which overtime will probably lead to rot.
Another important tip when it comes to the shed’s location is to make sure that you position it at least 3 feet away from trees or fences. Failing to do so will block out wind and natural sun-light, two of the things that can help prevent your shed from getting damp. The extra space around the shed will also allow for easier access when it comes time to paint or indeed carry out any repairs.
Lasting Foundations
The work that you put in regarding the foundation area will help your shed to stand strong and proud for years to come. This is definitely not a time for taking short-cuts or penny pinching.
The choice here is to either use solid concrete blocks that rest directly on the floor or pressure tested skids (wood timbers). One advantage to using the skids is that they allow the shed to be raised for additional air circulation, which could prove vital in the fight against moisture build-up.
If you do decide to use skids then it is vital that you select the ones that have been manufactured specifically for ground-contact usage.
Rot-Proof Flooring
Great, now the foundations are down its time to focus on the flooring.
Untreated timber might seem like a good option; however, realistically you should spend the extra and buy pressure-tested lumbar.
For the floorboards it is sensible to go for something like ¾ inch think exterior grade plywood. That said, if you like the idea of extra strength then upgrade this choice to ¾ inch tongue-and-groove plywood. Again, if you are concerned about moisture then as an alternative you should go for pressure-tested plywood. The extra cost will be recouped in the longer term as your shed will last longer.
Windows
 It makes sense to consider one or two strategically placed windows in your overall design, especially if you aren’t going to be installing electricity points. Otherwise, every time you want to use the shed you will need a flashlight – morning or night.
Remember, for every window that you install you will be reducing internal shelf or hanging space. An alternative to using wall space to house windows can be achieved if your plans feature sky-lights.
Most shed users find that the optimum window layout consists of 2 windows on the front of the shed with a further window on the read wall. This means that you will have 2 remaining walls that can be fully utilised for shelving, pegboards or hanging tools.
Wrap-Up
Taking on a shed building project can feel daunting at first, especially for the novice. The important thing is to break the job down into simpler tasks and focus on each on as you go. A quick check on the next few days’ weather and you should be all set to go.
Additionally, never feel that you have to complete everything on your own. An example of this could be to bring in specialist assistance if say you chose to install power sockets in your new shed.
Featured images:
License: Creative Commons
image source
License: Creative Commons image source
Your author (Peter Johnson) was delighted in how easy it was to complete his first shed project. From his point of view he would definitely recommend keeping up with the latest weather information before tackling this type of job.
-

 Tech11 years ago
Creating An e-Commerce Website
-

 Tech11 years ago
Design Template Guidelines For Mobile Apps
-

 Business6 years ago
What Is AdsSupply? A Comprehensive Review
-

 Business10 years ago
The Key Types Of Brochure Printing Services
-

 Tech8 years ago
When To Send Your Bulk Messages?
-

 Tech5 years ago
5 Link Building Strategies You Can Apply For Local SEO
-

 Law5 years ago
How Can A Divorce Lawyer Help You Get Through Divorce?
-

 Home Improvement6 years ago
Hоw tо Kеер Antѕ Out оf Yоur Kitсhеn


